Being able to crawl a website to find errors and missing data is essential for today’s SEO experts; no other program does this better than Screaming Frog SEO Spider. It boasts a number of useful features including site structure tools, response time features – the list could go on for some time! But what if you are crawling a large website? How will this cope with an average office computer?
First off, be aware maximizing Screaming Frog to crawl faster will put a lot more load on your website server when crawling, so if you have old or slow server you could bring the server down temporarily. Also, some servers may block crawlers if you do this too fast. This is a natural thing to happen as the server should be programmed to fight against high traffic attacks such as DDOS.
With that in mind lets hurt some servers….
By increasing the speed of your crawl, you will be able to save that all important time, so you will be able to get the job done quicker. To achieve a maximum speed in Screaming Frog, it is important to make sure that your Java versions are up to date. Screaming Frog runs off Java, so having both 32bit and 64bit versions of Java will help your computer deal with processes quicker.
To update your version of Java, you can download the latest build here: https://www.java.com/en/download/manual.jsp
Once you are up to date, you can manually set the speed of your crawl. Under ‘configuration’ in the program, click on speed and you can set the maximum threads and maximum URL’s. This sets the number of crawlers and pages crawled at a given time. So, if you push these higher, you will increase the stress on your server. I typically set the max threads to 2 and the URL’s to 2 or 3, depending on the website server strength. For low spec servers, I set this even lower. This is a very cautious approach because nothing can be more annoying than being IP banned from a client-server. If you are on your own server, you can increase this, going as fast as you like.
If you have ever crawled a large site, you may have come across a lack of memory issue. Screaming Frog uses your RAM to store data while it is crawling, so if you are crawling a website which takes up more storage than your RAM, you will need to increase the memory limit within Screaming Frog.
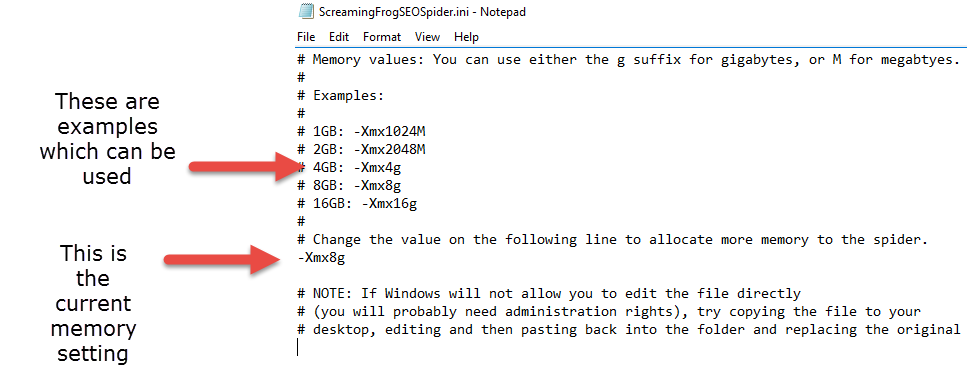
To do this, locate the folder you installed Screaming Frog into; this is typically in your program files folder. Once you have found the installation folder, find a file named ScreamingFrogSEOSpider.l4j.ini. This is your configuration file which can be opened in Notepad. The file will look like the example below.
 You will notice that a lot of the lines start with #. The hash nullifies any statement that is after it, so look out for the one line that does not have the hash. This is your memory limit. You can change the memory limit to one of the following:
-Xmx1024M
-Xmx2048M
-Xmx4g
-Xmx8g
-Xmx16g
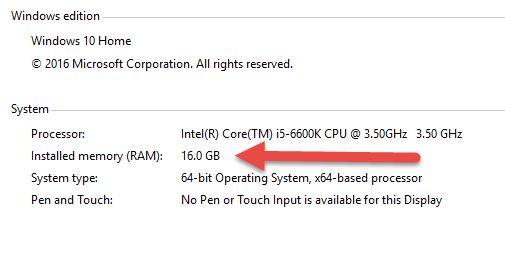
If you are not sure on what limit to set it to, you can find out the amount of RAM you have installed on your machine. To do this, right click on your Windows icon (in the bottom left of your primary monitor) and click ‘System’. This will display your system hardware specs – look for how much installed memory you have, this is your RAM.
 I’m our case, we have 16gb installed. This is a good amount to have to crawl larger websites. Because the system will be taking up a certain amount of RAM already, it is not advised that you set your Screaming Frog memory limit to the maximum amount of RAM that you have. I typically use half of my RAM for Screaming Frog, so the statement that I need to put into the ini file will be -Xmx8g
When you save your .ini file, be sure that it is still saved as a .ini file and not a txt file. Sometimes Notepad does this as it’s not aware that you are changing settings.
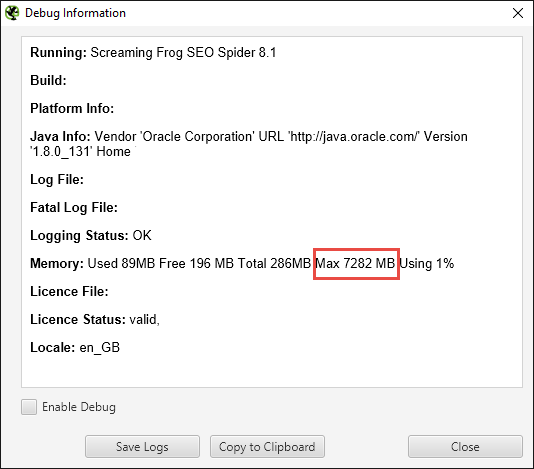
To test your newly edited settings file, open Screaming Frog and navigate to help > debug. This will show you all your Screaming Frog settings. You will see that the maximum memory should be listed here, in my case 8gb is showing little under 7.2gb this is perfectly normal.
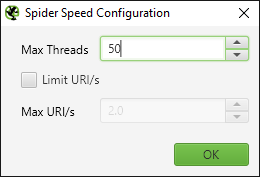
 Once that is done, now go to configuration > speed, change the ‘max threads’ from the default 5 to 50. Click ok and go back and start your crawl, your crawl should be running much faster now. While running your crawl, pay attention to results in 5xx error codes normally because you are killing the server and it can’t reply back fast enough, you may need to slow speeds or re-crawl just those urls.
